Showing posts with label Recipes. Show all posts

Monday, February 27, 2012

Kitchen Experiments

Recently, on Saturday mornings, I have been experimenting in the kitchen.  I am trying to recreate the type of coffee cake you find at your local coffee shop or bakery.  I love that sugary, buttery streusel that is sometimes nearly half as thick as the cake itself. I really wanted to try and make my own at home, so I started by looking for any coffee cake recipes with super thick streusel. I found one, and tried it out, but the cake part was a bit on the dry side.  The streusel, however, was nearly perfect. I decided to try and swap out the streusel recipe from one of my own tried-and-true coffee cake recipes with this new streusel recipe.  
So, the next Saturday, bright and early, I made Coffee Cake #2.  Unfortunately, it didn't work.  The bottom cake bubbled up and through the topping, and it took way too long to bake.  It tasted good, but certainly wasn't pretty - more importantly, it wasn't what I was trying to recreate.  On to Round Three.  I tried yet another coffee cake recipe with the new streusel, and still no luck.  Last weekend, I took a break - much to my family's dismay.  Next week, it's back in the saddle.

Here 's my tried-and-true coffee cake, before the streusel swap!  Even without a super thick streusel, it's still a great cake, and can make your Saturday morning pretty special indeed.

Buttermilk Coffee Cake
2 1/2 cup flour
1 cup brown sugar
3/4 cup white sugar
1 teaspoon cinnamon
1/2 teaspoon salt
3/4 cup butter
Mix the above ingredients until crumbly, and remove 1/2 cup of the mixture to reserve for streusel.  To this, add 1/3 cup chopped nuts. 
To the original crumb mixture, add:
1 teaspoon soda
1 teaspoon baking powder
In small bowl, mix :
1 egg
1 cup buttermilk
Add half of the milk mixture to the crumb mixture, and beat at medium speed for 2 minutes.  Add the remaining milk mixture, and beat for an additional 2 minutes.  Pour into a greased 9x13 inch baking pan and sprinkle with the reserved nut streusel.  Bake at 350 degrees for approximately 30-40 minutes.

Warmly,

Thursday, February 9, 2012

Looking For a Few Good Snacks


Popcorn Haystacks

1 quart popped corn (no butter or seasonings)
1 cup peanuts
3 oz. Chow Mein noodles
12 oz chocolate chips

Mix popcorn, peanuts, and noodles in large bowl and set aside.  Melt chocolate chips in microwave and pour over popcorn mixture.  Drop spoonfuls into paper cupcake liners, and refrigerate until firm.  Store in covered container.  Makes approximately 24.

*I doubled the recipe and used a variety of cupcake liners and candy liners.

Next on deck...Honey Nut Popcorn!

Wednesday, February 1, 2012

The rising of the bread


Be gentle when you touch bread. 
Let it not lie uncared for, unwanted. 
So often bread is taken for granted. 
There is such beauty in bread. 
Beauty in turf and soil, beauty of patient toil. 
Wind and rain have caressed it, Christ often blessed it. 
Be gentle when you touch bread.

-Irish Blessing

Wednesday, January 25, 2012

Sourdough Starter

I grew up very near an Amish settlement and have always admired the ways of their kitchens.  I discovered this book at my library, and I have enjoyed reading through the stories and the recipes.  The chapter on breads gives a recipe for sourdough starter and also includes recipes using the starter.  I've made my own sourdough starter before, but this one took a little different twist in letting the yeast and the water sit for several days in the refrigerator before adding the dry ingredients.  I started some last night, we'll see how it goes...and grows!  Lovina, the author, has included a recipe for cinnamon rolls using the starter.  I've never made cinnamon rolls with sourdough before - I can't wait!

Monday, January 23, 2012

Quilts and Popcorn!

I got back to some quilting this weekend.  I finally began some straight line quilting on my green quilt that has been waiting patiently for me.  I don't know why this quilt so often gets pushed to the back burner.  It feels closer to seeing completion this time, so I'm hopeful!  I also played around with a charm pack I won in a giveaway from Nanette many moons ago.  As you can see the cat wanted to play too!


With our big family, I am always on the lookout for snacks that are filling and at least sort-of healthy.  As such, we eat a lot of popcorn around here.  I usually pop two big pots on the stove and add some melted butter and salt, and although we really love it this way,  I think I'm going to play around with some different seasonings and flavors.  There are also some cookie-like creations I have found that use popcorn mixed with chocolate and nuts and such.  I'll keep you posted on how they turn out!

Tuesday, January 10, 2012

Getting to Know the Pattern Envelope

Oh, so long ago, I promised you a post on deciphering a pattern envelope. I didn't mean to keep you waiting quite this long...sorry! Life and holidays needed to come first, but even though it is really, really late, I hope some of you might find it useful. So, here we go...


Armed with your newly-taken measurements, your next stop will likely be for a pattern. Nowadays we are truly fortunate to have easy access to so many pattern companies, big and small. When you hear someone refer to the "Big Three" pattern makers, they are usually referring to Simplicity, Butterick, and McCall's, but there are soooo many more out there. It's definitely worth searching online and at smaller, independent retailers to see what's available.

In brick and mortar shops, the major pattern companies will have pattern books you can peruse, much like a large catalog, to find a project that catches your eye. The pattern themselves are usually housed in metal file cabinets categorized by company and then number. Once you have settled on a particular pattern, take out your measurements. In the catalog, you will not only see a photo of the front of the pattern envelope, but you will also see a copy of the envelope's backside. This is where all the important information is hiding. Each company has their own way of organizing this information, so you may have to search a little to find it. Don't forget to check the flap of the envelope, too! You are looking for a Body Measurements chart. Once you find it, compare your measurements to those on the chart. It is quite common to fall between two, or even three, different sizes. A good rule of thumb, is to either choose the size that fits the majority of your body, and/or choose the pattern size that corresponds with the most fitted part of your garment, usually the bust. A good pattern will include notes to help with pattern alterations, should they be necessary.

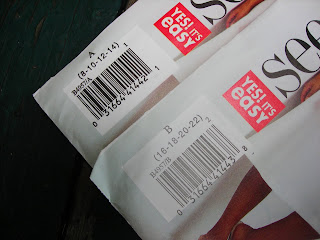
Now that you have your pattern number and your size, you will need to select it from the cabinet. Make certain you select the right size for you! Frequently, the pattern number itself will be sub-divided with a letter(s) in order to group three or four sizes into one envelope. Example, 2994A, 2994B, and 2994C. The number and letter of the pattern should be prominently displayed on either the upper right or upper left hand corner of the envelope.


Once you have found your pattern in your size, go straight to the back of the envelope yet again. Now you are getting to some fun stuff: choosing your fabric! Look for a heading entitled Suggested Fabrics. Read through the list and determine if any of the fabric types are recognizable to you. If so, go ahead and start to peruse the bolts of fabric. If you find yourself a bit confused or overwhelmed, find someone in the store to help you. These fabrics aren't hard and fast rules, but they are simply suggestions from the pattern manufacturer. When you first begin to sew, it is helpful to follow their suggestions until you learn how the different types of fabric react. As a very general rule, woven fabrics (non-stretchy) are much easier to work with than knit fabrics (stretchy). Very sheer and silky/slippery fabrics can be difficult for a beginner, too. Another helpful hint can be to not choose your fabric on the same day you choose your pattern. It never hurts to take your pattern home and study it a bit more. Look through ready-to-wear styles that might be similar to your pattern and pay attention to the types of fabrics they are sewn from. Look through your own wardrobe and find the types of fabrics that are flattering and comfortable to wear. And you can even go online and search for reviews of the pattern. I love to search through patternreview.com. I have learned so much from this site. Don't be afraid to take your time in this process!

There are a few more items on the pattern envelope that are worth talking a bit about, but I will save those for another time. Even though this post is incredibly long, I will leave you with a dinner recipe to simmer in the crock-pot while you are out pattern shopping! We have to make time for the important stuff, you know!

Sweet Lentil Stew

1 medium onion chopped
Approximately 1 cup celery, chopped
Approximately 1 cup carrots, chopped
butter to saute the above
2 cups lentils, washed
1 cup or so of chopped ham
salt
pepper
2 - 3 Tablespoons brown sugar

Saute the onion, celery, and carrots in butter until slightly tender. Combine these and all other ingredients in a 5 - 7 quart crock-pot. Add water to fill the pot. Cover and cook on low for 4 hours, or until lentils are tender. Adjust seasoning to taste, if needed.


Happy New Year! May you find lots of time and inspiration to sew and create in 2012!

Wednesday, August 3, 2011

Feelin' blue

Or maybe it's more appropriate to say "seein' and eatin' blue!" My little, above-the-fridge freezer is bursting at the seams with sweet, sweet blueberries.

Last weekend we took a trip to Maine where we managed to pick 24 lbs. of berries in less than 45 minutes. The bushes were loaded, and the pickin' was easy. It was a beautiful day. Back in Illinois we always picked blueberries every summer, and I froze them, made jam, and baked with them all winter. This was the first time we have had the opportunity to head to a pick-your-own farm in six years! It didn't take long for our fingers to remember the familiar routine and rhythm of filling our containers.


Driving in Maine is so wonderful. The scenery is breath-taking. You never know what you are going to find around each curve of the road. Sometimes you will find a little humor...

What do you think of these guys? Beauty or humor, I'll let you decide!


Once back home, most of the berries went quickly to the freezer. I want to make some freezer jam, but knew I wouldn't have time this week. I can always pull them out later to make a couple batches.

I did, however, make time to whip up a batch of these...

Blueberry Muffins
3/4 cup milk
1/2 cup canola oil
1 egg
2 cups flour (you can use 1 cup whole wheat plus 1 cup all-purpose)
1/3 cup sugar
1 Tablespoon baking powder
1 teaspoon salt
1 cup blueberries

Preheat oven to 400 degrees. Grease muffin pan. In large bowl, beat milk, oil, and egg. In medium bowl, combine flour, sugar, baking powder, and salt. Stir dry ingredients into wet with wooden spoon. Do not overmix, there will likely be lumps. Fold in berries. Spoon into prepared muffin tin. Bake for 18 to 20 minutes. Makes approximately 12 muffins.

Lovely and sweet, indeed - enjoy!
-Elizabeth