Showing posts with label sewing. Show all posts

Friday, February 3, 2012

A Gift for Baby


I finished up this baby set a week or so ago, and am just now getting it in the mail.  Running to the post office around here can sometimes be quite a chore.  Some weeks it fits seamlessly into our routine, and other times, not so much. 
 The parents are close friends of ours, and this is baby #4 for them as well.   I love, love, love vintage children's prints, and this one from The Little Engine that Could is so sweet. The Little Golden Books will forever remain classics.  Somehow they manage to seem vintage even when they are brand new.  And I love that you can still usually find them at the grocery store, just as I did growing up. 


As I do with a a lot of baby/child quilts I make, I tied it with a soft yarn versus machine quilting.  I think the ties keep the quilt soft and cozy, and give it a bit of an old-fashioned touch - sort of like something made by Grandma.  I know many people tie their quilts with the excess yarn on the top side, but I have always done it in reverse, with the ties on the back side.  This is just the way I was taught.  I don't see many done this way, though.  How do you tie yours? I included a knit washcloth and two matching burp pads.  (As I well remember, by the time you get to baby #4, having matching anything feels extravagant!)

I wanted to include something for the older sibs, too, so I put together a couple of zipper purses for the girls and a pillowcase for the boy.  Unfortunately, I didn't grab a pic of the pillowcase.  It was hopefully suitably boyish, made from an alien novelty print I had stashed.


It is fun putting together gifts for others.  And, especially, when you know how much it will be appreciated.  

Happy Weekend!

Thursday, January 19, 2012

Pincushion Parade!

 
These pincushions are true workhorses of my sewing room.  They see heavy use and tend to be a little frayed around the edges!  Some are homemade, and others have been collected here and there at rummage sales and thrift stores.  To be honest, I didn't realize I had this many until I went searching to gather them up for a photo!  And, I think I'm missing a few, too!


This one gets a spot of honor as my son found it for me at a secondhand shop, and it's definitely old.  Another seamstress long ago took some time to embellish not only the cushion itself, but she also made tiny, satin toppers for some of the longer pins.  It's very sweet, and I keep it on top of an antique sewing cabinet in my sewing room.
Go over to the Pincushion Parade at Love, Laugh, Quilt to see lots and lots more 'cushions!  And add yours to the mix, too!

Friday, January 13, 2012

A Handmade Christmas

Since I didn't have the chance to share some of my hand made Christmas gifts with you before Christmas, I thought I'd share a couple now.  A while back, Beth over at Love, Laugh, Quilt gave a great tutorial for making her version of a rag doll.  I really liked them, and so I made one for my niece.  I added a few of my own touches, and I loved her.  I have to admit, she was hard to send off in the mail!  I had her perched on my sewing table for a few days, and I missed her once she was gone!  I got over it quickly, especially when my sister-in-law and brother sent me a great pic of her being loved on by my niece.  She named her Arthur!


Another brother was the recipient of a fuzzy pair of crocheted slippers.  These were actually a year late.  I had made them last year, but was off on the size, so I re-did them. (Somehow, I thought his feet were nearly three sizes bigger than they actually are!) I just didn't mean for them to take so long!  This year's sizing was a success, though, so hopefully they were worth the wait!


We had a wonderful Christmas this year.  Different in many ways, but with lots of good memories nonetheless.  I hope yours was memorable, too.

More soon,

Tuesday, January 10, 2012

Getting to Know the Pattern Envelope

Oh, so long ago, I promised you a post on deciphering a pattern envelope. I didn't mean to keep you waiting quite this long...sorry! Life and holidays needed to come first, but even though it is really, really late, I hope some of you might find it useful. So, here we go...


Armed with your newly-taken measurements, your next stop will likely be for a pattern. Nowadays we are truly fortunate to have easy access to so many pattern companies, big and small. When you hear someone refer to the "Big Three" pattern makers, they are usually referring to Simplicity, Butterick, and McCall's, but there are soooo many more out there. It's definitely worth searching online and at smaller, independent retailers to see what's available.

In brick and mortar shops, the major pattern companies will have pattern books you can peruse, much like a large catalog, to find a project that catches your eye. The pattern themselves are usually housed in metal file cabinets categorized by company and then number. Once you have settled on a particular pattern, take out your measurements. In the catalog, you will not only see a photo of the front of the pattern envelope, but you will also see a copy of the envelope's backside. This is where all the important information is hiding. Each company has their own way of organizing this information, so you may have to search a little to find it. Don't forget to check the flap of the envelope, too! You are looking for a Body Measurements chart. Once you find it, compare your measurements to those on the chart. It is quite common to fall between two, or even three, different sizes. A good rule of thumb, is to either choose the size that fits the majority of your body, and/or choose the pattern size that corresponds with the most fitted part of your garment, usually the bust. A good pattern will include notes to help with pattern alterations, should they be necessary.

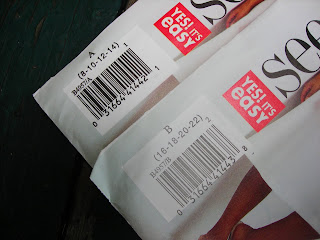
Now that you have your pattern number and your size, you will need to select it from the cabinet. Make certain you select the right size for you! Frequently, the pattern number itself will be sub-divided with a letter(s) in order to group three or four sizes into one envelope. Example, 2994A, 2994B, and 2994C. The number and letter of the pattern should be prominently displayed on either the upper right or upper left hand corner of the envelope.


Once you have found your pattern in your size, go straight to the back of the envelope yet again. Now you are getting to some fun stuff: choosing your fabric! Look for a heading entitled Suggested Fabrics. Read through the list and determine if any of the fabric types are recognizable to you. If so, go ahead and start to peruse the bolts of fabric. If you find yourself a bit confused or overwhelmed, find someone in the store to help you. These fabrics aren't hard and fast rules, but they are simply suggestions from the pattern manufacturer. When you first begin to sew, it is helpful to follow their suggestions until you learn how the different types of fabric react. As a very general rule, woven fabrics (non-stretchy) are much easier to work with than knit fabrics (stretchy). Very sheer and silky/slippery fabrics can be difficult for a beginner, too. Another helpful hint can be to not choose your fabric on the same day you choose your pattern. It never hurts to take your pattern home and study it a bit more. Look through ready-to-wear styles that might be similar to your pattern and pay attention to the types of fabrics they are sewn from. Look through your own wardrobe and find the types of fabrics that are flattering and comfortable to wear. And you can even go online and search for reviews of the pattern. I love to search through patternreview.com. I have learned so much from this site. Don't be afraid to take your time in this process!

There are a few more items on the pattern envelope that are worth talking a bit about, but I will save those for another time. Even though this post is incredibly long, I will leave you with a dinner recipe to simmer in the crock-pot while you are out pattern shopping! We have to make time for the important stuff, you know!

Sweet Lentil Stew

1 medium onion chopped
Approximately 1 cup celery, chopped
Approximately 1 cup carrots, chopped
butter to saute the above
2 cups lentils, washed
1 cup or so of chopped ham
salt
pepper
2 - 3 Tablespoons brown sugar

Saute the onion, celery, and carrots in butter until slightly tender. Combine these and all other ingredients in a 5 - 7 quart crock-pot. Add water to fill the pot. Cover and cook on low for 4 hours, or until lentils are tender. Adjust seasoning to taste, if needed.


Happy New Year! May you find lots of time and inspiration to sew and create in 2012!

Monday, August 15, 2011

Tips for Choosing Your First Sewing Pattern-Part 1

One of the classes I teach at my local sewing store is an Intro to Sew Class
that's geared for the beginner or novice sew-er. One of the questions that I get a lot is how to choose a do-able pattern. I think it is really important for the student and the teacher to work with a pattern that helps to encourage the sewing bug. It's no fun and discouraging to sew with a pattern that is too difficult or complex. Because sewing should be fun - it should be lowering your blood pressure, not raising it!

The first step is to find out your body measurements. I cannot stress enough the importance of knowing your measurements before you begin to look at patterns. The size of a sewing pattern does NOT correspond with ready-to-wear sizing. Usually you will require a couple sizes larger in a sewing pattern. I tell my classes, that it is simply a number and not to worry about it. Since you are the one making the garment, you won't be putting a size label in it anyway!


How to take your body measurements

Having your basic body measurements is an important part of learning to construct a garment. Learning how to correctly measure your body to obtain your measurements is a must! For all measurements, you will need a flexible measuring tape; these are inexpensive and widely available at all sewing and discount stores, and even sometimes at the grocery/drug store. Wearing light-weight clothing, hold the measure tape close to your body, but do not pull too tight. Do not measure over thick clothing such as a jacket or sweatshirt. A full-length mirror, and a friend, can be helpful when taking your measurements. The major body measurements are as follows,

Bust: Measure around your upper body at the fullest point of your bust.

Waist: Measure around your waist where you feel a natural “dip” in your waistline. Due to the popularity of low-rise pants, your natural waist is usually much higher than the waistband on your clothing. If in question, tie a piece of yarn, string, or elastic around your middle and sit down. As you sit, the string should naturally “roll” up or down to your waistline.

Hips: Measure around the fullest part of your hips, as you did when measuring your bust.

Back-Waist-Length: Tilting your head forward, "feel" for a protruding bone at the base of your neck. Using this bone as a starting point, measure from there down to your natural waistline.

Over time, as your skills grow, you will encounter other measurements, but the ones listed above are your solid foundation. A good sewing book is always a helpful reference, and will include charts and illustrations for measuring your body.

Now that you have your measurements, record them on your phone, write them down, tuck them in your purse - you will need them when you go shopping at the fabric store!

Stay tuned for Part Two - Getting to Know the Pattern Envelope!